External wall insulation details
EWI: what changes around eaves, sills and pipes?
External wall insulation adds a layer of boards and render to the outside of a wall, so the finished face moves outward. Every feature that was set out from the old face, from the eaves and sills to downpipes, vents and meter boxes, then has to be extended, moved or rebuilt. This article goes through those details one by one.

On this page
How far the wall moves out
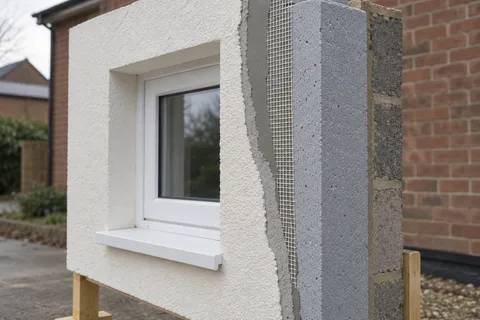
In Structherm's NSC2 system, the build-up is insulation board, a meshed base coat of 4–6mm in total and a finish, so the new face stands out from the old one by the board thickness plus a few millimetres of render. Boards come in a range of thicknesses, typically in 10mm steps, and the thickness chosen is the figure every other detail is measured from.
Draw a simple section through the wall at a window, at the eaves and at the ground, with the old face and the new face both marked. The gap between the two lines shows how far each sill must project, how much roof overhang is needed and how much room the base track will have above the DPC.
That is why EWI should be considered as a coordinated project rather than a render job with boards added: the roofer, window fitter, plumber, electrician and gas engineer may all have work at the edges of the system. Items that cannot simply be refixed, such as a flue or a meter box, need their specialists booked before the boards go on.
| Element | Usual change |
|---|---|
| Sill | Over-sill or longer replacement sill |
| Eaves | Boards tucked under the overhang, or fascia and gutter extended |
| Downpipe | Longer brackets and new offsets |
| Vent or flue | Extended to finish beyond the new face |
| Meter box | Moved by the supplier |
Eaves and verges
The top of the system is where rain does most damage if it gets behind the boards. Where the roof overhang is deep enough, the insulation stops beneath the soffit and is closed with a trim, so the overhang still sheds water clear of the new face. Where it is not, the roof edge is extended: new fascia and soffit set further out, and the gutter moved with them. That is roofing work, often by another trade, and it has to be finished before the top of the system is rendered.
Gable verges raise the same question. A verge that barely oversails the old wall will be behind the new face once the insulation is on, so it needs extending or a capping trim. Structherm's NSC2 data sheet lists bellcast, capping, bead and joint profiles among its accessories, which shows how much of an insulation system is about trims at its edges.

Sills, reveals and doors
Old sills almost never project far enough once the wall is thicker. The usual answer is a new over-sill fitted on top of the old one, or a replacement sill long enough to clear the finished face with a drip underneath. Reveals are lined with a thinner insulation board where there is room between the frame and the reveal edge; where there is not, the frame position may need rethinking, particularly if windows are being replaced anyway.
Doors bring thresholds and steps into it. A front door that opens onto a step at the pavement line may leave very little room for the system at its base, and a letterbox or bell push on the wall has to move. These details are easier to solve on paper than on the scaffold.
The Leeds rendering options include render-only work as well as insulation. Be clear which one is being priced, because the sills, reveals and trims described here only apply when the wall grows thicker.
Pipes, vents, meters and cables
Everything fixed to the wall has to come off or be extended. Downpipes go back on longer brackets that reach through the insulation into the masonry, often with new offsets at the gutter outlet and at ground level. Soil pipes and waste pipes need the same treatment, and vents and extractor outlets need extending so they still finish outside the new face rather than behind it.
Some items need specialists. A boiler flue passing through the wall should be extended or altered by a qualified gas engineer. Gas and electricity meter boxes on the front of a terrace may need the supplier to move them. Outside lights, alarm boxes and cables need an electrician, and satellite dishes need refixing on brackets suited to an insulated wall. Each penetration through the finished render is then sealed so water cannot track along it into the boards.
List every item on each wall, from downpipes to doorbells.
Mark which are removed and refitted, extended, moved or replaced.
Arrange the trades: plumber, electrician, gas engineer, utility company.
Fit the boards and base coat around agreed positions.
Refit each item on fixings that reach through the insulation into the wall.
Seal every penetration and check each item works.
The base of the wall and checks before covering
At the bottom, the system starts on a base track above the damp-proof course, so the insulation does not bridge it. On a terrace front that rises straight from the pavement, the gap between paving and DPC can be small, which limits what is possible and should be checked at the survey. If scaffold or materials have to stand on the pavement while the work is done, Leeds City Council permission is needed.
Before the base coat hides anything, photograph the boards, fixings and trims at each sill, eave and penetration. Structherm's guidance for its base coat also gives the working limits: no work below 5°C or above 35°C, protection from rain for at least 48 hours, and no downpipes, sills or scaffold throwing water onto setting render. That last point is why downpipes often discharge into temporary hoses during the job.
At completion, check that every listed item has been refitted, works and is sealed, and keep the system details. Historic England's guidance on EWI is a reminder that moisture behaviour of the whole wall matters, so the next person to cut into it needs to know what is there.
A worked example on a terrace front
For example, take a hypothetical brick through-terrace where only the front is being insulated. The survey lists a downpipe on the party line shared with next door, a gas meter box, a front-door step at pavement level, two sash windows with stone sills and an eaves overhang of only a few centimetres.
Each item gets a plan. The shared downpipe is agreed with the neighbour and refixed on longer brackets. The meter box is moved by the supplier. The sills get over-sills sized to the new face. The eaves overhang is too shallow, so the fascia and gutter are extended before the boards go on. At each party line, the system is closed with a sealed trim so rain cannot get behind it. At the step, the clearance above the DPC decides whether a thinner board is used for the bottom course.
Common questions
Can the gutter stay where it is?
Only if the roof overhang still clears the new wall face by enough to shed water. If not, the fascia and gutter are extended outward before the insulation is finished.
Who moves a gas meter box?
The gas supplier or its contractor. Ask early, because the system cannot be finished around the box until it is in its final position.
See housing and planning information for Leeds and nearby places, including the source and geography behind each figure.