Windows and render
How rendering fits into a window-replacement project
New windows and new render meet at every opening: the frame, the sill, the reveal and the head. Done in the right order, the render finishes neatly to the new frames and the sills shed water clear of the wall. Done the wrong way round, openings are cut and patched in fresh render. This article explains the sequence and the details.

On this page
How thick the new wall face will be
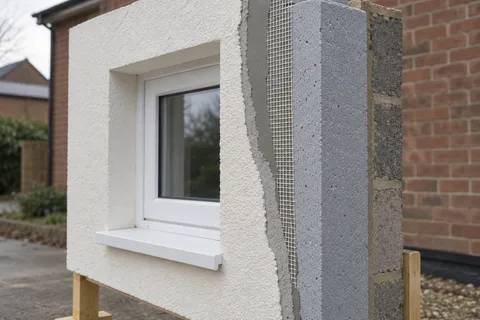
Every opening is set out from the finished wall face, so start by working out where that face will be. Fresh render on a stripped wall adds its full thickness to the masonry. A thin-coat system is modest, while a scraped monocouche such as Parex's Monorex GM finishes at no less than 15mm after scraping. The render assembly, not just the visible finish coat, sets that depth, and it decides how far sills must project and how deep the reveal returns will be.
An insulation project moves the face much further. In Structherm's NSC2 system, insulation boards are fixed to the wall and finished with a meshed base coat totalling 4–6mm plus a topcoat, so the new face sits out by the board thickness plus the render. Sills sized for the old wall will be far too short, and frames may be better set forward into the insulation layer.
Measure each opening at the survey: the frame depth, how far the existing sill projects and the reveal width. Set against the planned render or insulation depth, those figures show straight away which sills need extending or replacing, and whether the window installer should fit longer sills from the start.
| Measure | Why it matters |
|---|---|
| Frame depth in the opening | Sets how deep the reveal return will be |
| Existing sill projection | Shows whether it will clear the new face |
| Reveal width | Room for render, trim or insulation lining |
| Head detail | Space for a drip above the frame |
Windows first, render second
In most cases the windows go in before the render. Taking an old frame out damages the reveal around it, and fitting a new one means fixings, packers and foam that are then covered by the render. If the render is done first, the opening has to be cut back and patched once the windows arrive, and patches in fresh render rarely disappear.
The sill is the detail to get right. A new render coat stands proud of the old face by its full thickness, so a sill that projected nicely from the old wall may end up nearly flush with the new one. Water then runs over the front edge and streaks the wall below. Order sills long enough to project past the finished face with a drip underneath, and if insulation is planned, allow for the much deeper wall.

Agree the frame position and sill size against the finished wall face.
Remove the old windows and repair the opening.
Fit the new frames and sills, sealed to the masonry.
Fix beads around the opening and across the head.
Render the wall and return it into the reveals up to the frame bead.
Seal the render-to-frame junction and remove the protective film.
How the render meets the frame
The render runs into the reveal and stops at the frame. A neat result uses a bead or a purpose-made trim along the frame edge, giving the render a straight stop and leaving a small gap for sealant, so the frame can move slightly without cracking the render. Smearing render straight onto a uPVC frame looks tidy for a few weeks and then cracks away.
At the head of the opening, a drip detail stops water running back under the render onto the frame. Catnic describes its bell-cast bead for use above and below doors and windows as well as at DPC level, for exactly that reason. Corners of openings are where cracks start, so the base coat carries extra mesh set diagonally at each corner.
The Leeds rendering overview separates render-only work from external wall insulation. With insulation, the reveal becomes much deeper, the frame position may move outward into the insulation layer, and the sill grows accordingly, so be clear which project the window installer is pricing against.
Protecting new windows during rendering
New frames arrive with protective film, and that film should stay on until rendering is finished. Render, primer and silicone finish stain uPVC and glass, and cement splashes can mark glass if they are left to harden. Masking with film and tape goes over the frames before each coat, and it is removed promptly afterwards so the adhesive does not bake on in the sun.
Windows covered by masking cannot be opened, which matters in bedrooms and kitchens, so plan the rendering of each elevation to keep the masked period short. Opening sashes should not be used against wet render in the reveal, because the frame edge will drag through it.
Scaffold placed close to new windows needs care too. Boards should not rest against frames, and ties should not be fixed through new reveals.
A worked example: a bay window on a rendered semi
For example, take a hypothetical 1930s semi with a front bay of three windows, a small bay roof and a cracked render front that is to be stripped and re-rendered. The new windows are ordered first, with sills sized for the new render face rather than the old one.
On site, the old frames come out and the brick around the openings is repaired. The new frames go in, the bay roof's flashing is checked or renewed, and only then is the front stripped and rebuilt. The render returns into each reveal to a trim at the frame, the corners of each opening get diagonal mesh, and a drip detail goes across the heads. The bay roof junction is the last place to check before the scaffold comes down, because it is where water most often finds its way behind new render.
Checking the junction before and after the finish
Before the base coat goes on, look at each opening: the frame fixed and sealed to the masonry, the sill bedded with a slight fall outward, the reveal repaired after the old frame came out, and beads fixed straight. These are hard to see once the render is on, so photograph them.
After the finish, check from the ground. The sill should project past the render with a drip underneath, the render should stop cleanly at the frame bead with a continuous sealant line, and there should be no render or primer on frames, glass or handles. A thin strip of extra render added to hide a gap between frame and wall is a sign the positions were not agreed.
In a conservation area, replacement windows and render may both need consent; Leeds City Council lists rendering among the works restricted there. Check both before ordering, because a refusal on one changes the detail of the other.
Common questions
Can I replace the windows after the house has been rendered?
Yes, but expect patching around every opening, because removing a frame damages the reveal. On a through-coloured or silicone finish those patches tend to show, so it is better to do the windows first if both are planned.
Who should decide the sill size?
Whoever designs the finished wall, working with the window supplier. The sill has to project past the final render or insulation face with a drip underneath.
See housing and planning information for Leeds and nearby places, including the source and geography behind each figure.