Brick and render extensions
Render choices for a mixed brick-and-render extension
An extension can combine brick and render: brick at the base or on one wall, render on the rest. The mix looks deliberate or accidental depending on where each material stops and how the junctions are built. This article explains which renders suit the blockwork, how to see brick, mortar and render together, where the boundaries should fall and how the details are made.

On this page
Which render goes on the blockwork
Where the extension is built in blockwork, several systems suit it. Silicone goes on as a thin resin topcoat over a meshed base coat and primer; Structherm's topcoat comes in 1.0, 1.5 and 3.0mm grains and is applied to the thickness of the grain. A scraped monocouche is sprayed on thick in one coat and scraped back, finishing at no less than 15mm in Parex's Monorex GM. Both are through-coloured, so neither needs painting.
Lime is a different case. It belongs on old stone or soft brick walls that need to dry out through their face, so it is only relevant where the extension meets traditional fabric, such as a new panel abutting an old lime-rendered gable. There the old wall keeps its lime, the new wall takes a modern system and a stop bead separates the two.
Thickness affects the look. A 15mm-plus monocouche stands further forward of the blockwork than a thin silicone on its base coat, so the step between brick and render differs between systems. Decide whether the render should sit proud of the brick, flush with it or set back, and choose the system and beads before the brick is laid.
| System | How it is built |
|---|---|
| Thin-coat silicone | Meshed base coat, primer, topcoat to grain depth |
| Scraped monocouche | One thick through-coloured coat, scraped back |
| Painted sand-and-cement | Scratch coat and float coat, then masonry paint |
| Lime | Only where the panel meets traditional fabric |
Seeing brick, mortar and render together
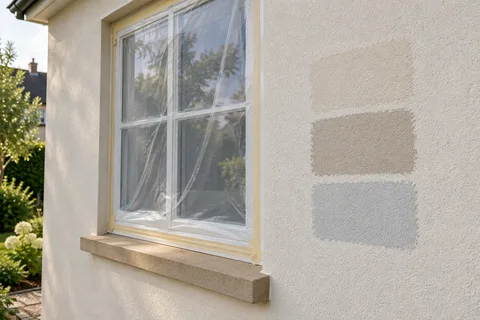
A loose brick hides how much the mortar changes a wall. Look at a panel built with the chosen brick and mortar, or an existing wall in the same brick, and hold the render sample against it outdoors. A cool grey mortar and a warm buff one can make the same brick read as two different colours beside a render.
For example, with a hypothetical extension in a multi-toned red brick, a pale render picks out the lightest bricks and makes the wall look brighter, while a warm mid-tone render recedes and lets the brick dominate. Neither is right or wrong; the sample shows which effect you are getting.
Look at texture under low sun as well as at midday. A scraped render, a fine silicone grain and a brick face all catch side light differently, and a combination that looks balanced at noon can look busy in the evening.


Where the brick stops and the render starts
Plan the boundaries on an elevation drawing. Clean lines usually fall at corners, at the edges of openings or along a horizontal course such as a plinth or a band at first-floor level. A line placed partway across a plain wall needs its own bead and sealed edge, and it tends to look like a repair.
Relate the extension to the original house. If the house is brick, a rendered panel set within brick returns can make old and new read as one building; if the house is rendered, a brick plinth or brick wall on the extension can echo existing brick features such as chimneys or garden walls. Naming the element that is meant to connect old and new keeps the design consistent.
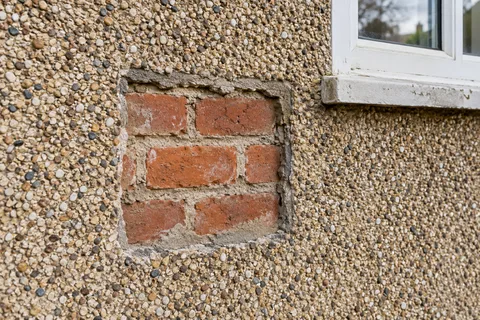
Small panels are the hardest to make look intentional. A narrow strip of render between two windows, or a few courses of brick under a rendered panel, can look like a leftover rather than a choice, and every short panel adds beads, edges and junctions to keep watertight.
Among the rendering services in Leeds, silicone, monocouche and painted render can all suit new blockwork; the right one depends on the texture wanted and how the panel meets the brick.
Samples for brick and render together
A render sample on its own tells you little about how it will sit beside a particular brick. Build or borrow a small panel of the chosen brick with its mortar, and set the render sample beside it outdoors, in the position where the two will meet. Look at it from the garden, from the street and up close, at different times of day. Mortar colour changes the brick more than most people expect, so judge the combination, not the brick alone.
Texture matters as much as colour. A scraped monocouche reads as a soft, slightly granular surface; a 1.0mm silicone grain is nearly smooth; a 3.0mm grain is visibly textured. Structherm offers its silicone topcoat in 1.0, 1.5 and 3.0mm grains, which gives a sense of the range. Place samples of the finish you will actually get, not a smooth colour card.
With through-coloured renders, colour also varies with batch and timing. Parex asks for one batch per facade and for each elevation of its monocouche to be scraped at the same stage, because early and late scraping give different shades. On an extension that will be seen next to a brick plinth, that consistency is what makes the panel look deliberate.
Details where brick and render meet
Where render sits above a band of brick, the bottom edge of the render needs a drip so water falls clear of the brick face rather than running down it. A bell-cast bead does that job; Catnic describes its bead for use above or below openings and at DPC level so rainwater drains clear of the substrate beneath. Where render stops beside brick on the same plane, a stop bead gives a straight, sealed edge.
Think about which material is in front. Render adds its own thickness to the blockwork behind it, so a rendered panel and a brick panel will rarely finish flush. Some designs set the render slightly forward with a drip, others recess it; either works if it is drawn, but an accidental half-centimetre step looks like a mistake.
Openings, pipes and fittings that cross a boundary need the most care. A sill that spans brick and render, a downpipe running across a rendered panel or a light fixed into a narrow render strip all create awkward junctions. Move them on the drawing before building, not after the finish.
Finally, plan the sequence. Brickwork goes up first, then roof and windows, then render. Finished brick should be protected from render splashes, and render should be kept off brick sills and copings with masking. At completion, keep the product references and a marked drawing showing which areas are brick and which are rendered.
Common questions
Can the render and the brick be finished flush?
Yes, if the blockwork behind the render is set back by the render's thickness when the extension is built. Decide this before the walls go up, because it cannot be changed afterwards.
Does a rendered extension need movement joints?
Where the render crosses a change of background, such as block meeting the original brick, a bead or joint gives that movement a controlled line instead of a random crack.
See housing and planning information for Leeds and nearby places, including the source and geography behind each figure.